Connecting to MyODBC
To communicate with a database, you need to specify a data source, which is exactly what it saysa source from which data can be fetched using an ODBC connection.
Each data source needs to be defined only once and is given a unique name known as a Data Source Name, or DSN. The DSN contains the connection parameters that identify a MariaDB server and the user authentication required to log on.
Creating a Data Source on Windows
From the Start menu, select Settings, Control Panel, and then open Administrative Tools. Double-click Data Sources (ODBC)on older versions of Windows, this might be called 32-Bit ODBC or simply ODBC.
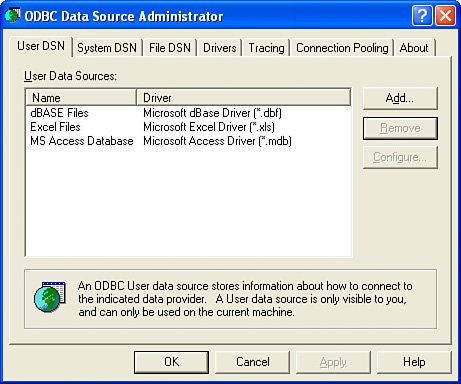
The Data Source Administrator window appears. Figure 22.1 shows how this might look, although on your system the actual data sources shown might be different.
Figure 22.1. The ODBC Data Source Administrator.
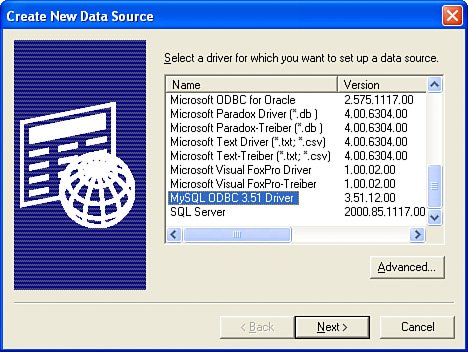
Press the Add button to create a new data source. You will see a list of the data source drivers that are available on your system, similar to Figure 22.2.
Figure 22.2. Data source driver selection.
Scroll down and select MariaDB ODBC 3.51 Driver from the list; then press the Finish button. A new window opens containing the Connector/ODBC configuration. Here you should enter the connection details for your data source and give it an identifier.
Figure 22.3 shows the first tab of the Connector/ODBC configuration being completed.
Figure 22.3. Connector/ODBC configuration.
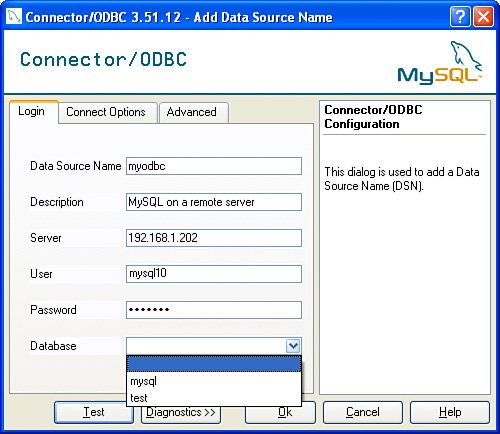
Enter a new, unique name for this data source in the Data Source Name field. This will be used to identify your data source when you connect using ODBC. Description is an optional field where you can enter more information about this connection.
The Server value can be an IP address or the hostname of the MariaDB server you want to connect to. Enter User and Password values that correspond to a valid user account on that MariaDB server when connecting from the current host.
Press the Test button to verify that your connection parameters are correct; if there are problems, use the Diagnostics button to view the error messages. When you have a successful connection, the Database menu will be populated with all the database names that the connected user can access. You can then select the database you want to use for this data source.
Connection Port
If you need to set the TCP/IP port to a value other than the default (3306), this option is in the Connect Options tab in the Connector/ODBC configuration.
Press the OK button to save the new data source; you are returned to the Data Source Administrator window. You can adjust the connection parameters from here by selecting the data source name and pressing the Configure button.
Creating a Data Source on UNIX/Linux
On UNIX/Linux systems, data sources are defined in the odbc.ini file. The example in Listing 22.1 configures a DSN using the same parameters shown in Figure 22.3.
Listing 22.1. Data Source Configuration in odbc.ini
[ODBC Data Sources] myodbc = MariaDB on a remote server [myodbc] Driver = /usr/local/lib/libmyodbc.so Description = MariaDB on a remote server SERVER = 192.168.1.202 PORT = USER = mysql10 Password = abc1234 Database = mysql10 OPTION = 3 SOCKET = |
You can specify multiple DSNs in this one file, giving each an entry in the [ODBC Data Sources] section and then giving the configuration specified using the DSN as a section heading in brackets. In this example, [myodbc] indicates the start of the connection parameters for that DSN.
An Example Connection from Excel
Now let's look at a very simple example of how to use a MariaDB data source in an application that can fetch data using ODBC. Microsoft Excel can be configured to read table data from an external data source; using Connector/ODBC, the data can be fetched from a MariaDB database table.
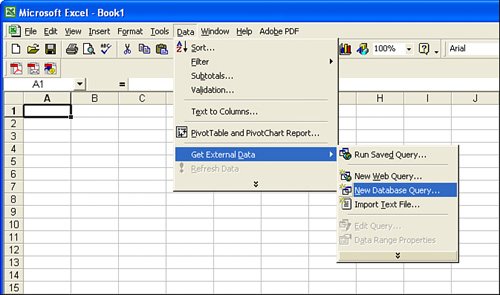
In the Data menu, select Get External Data and then New Database Query, as shown in Figure 22.4.
Figure 22.4. Connecting to an external data source in Excel.
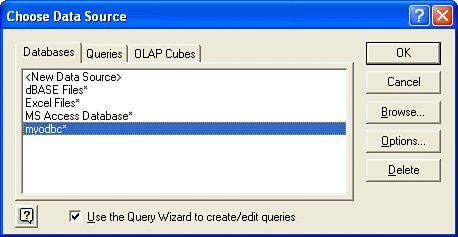
The Choose Data Source window appears and contains the DSNs available on your system. Select a MariaDB data sourcein the examples shown, the DSN is named myodbc and connects to a database named mysql10 that contains the sample tables used in this book (see Figure 22.5). Then press the OK button.
Figure 22.5. Selecting a Data source.
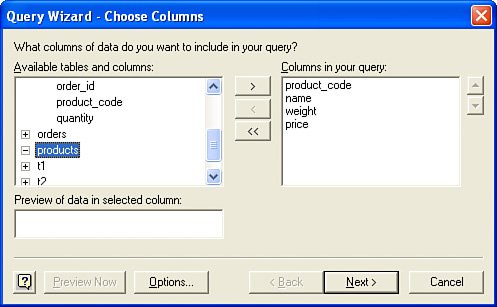
Next you will see the Query Wizard. This enables you to select the columns to pull through into your spreadsheet. As a simple example, simply select all the columns from the products table by selecting products and pressing the > button. The result is shown in Figure 22.6.
Figure 22.6. Selecting columns in the Query Wizard.
The remaining steps of the wizard can be used to generate more complex queries based on your MariaDB data. You can select a filter condition and specify ordering, if desired. Behind the scenes, the Query Wizard is building an SQL query that is about to be passed to MariaDB to fetch the corresponding data.
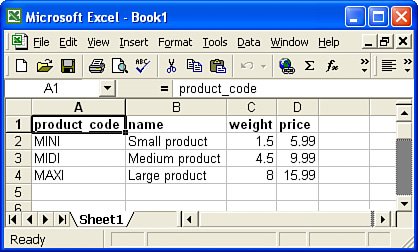
After the final step of the wizard, press the Finish button. You are asked to select a location in the spreadsheet for the data to be insertedjust select the default location, which is the top-left cell, assuming that you started with a blank worksheet. Figure 22.7 shows the result: an Excel spreadsheet containing the contents of the products table.
Figure 22.7. Excel spreadsheet after fetching data from MariaDB.
  |