Effect Menu Commands
This section explains commands under the GoldWave's Effect menu. Please see the Effects Overview section for general information about how GoldWave employs effects.
Censor
- Censor in the Effect menu.
- Censor effect in the Add Effect window of Batch Processing.
Censor replaces the selection with a tone (beep), static, clipboard audio, or gibberish. Use this effect to cover up profanity, cleanly overwrite dialogue with other dialogue, or make dialogue almost unintelligible.
| Censor Settings
| |
|---|---|
| Setting | Description |
| Censor type | Sets the sound to use to replace the selection. Most of the censor types are simple tones or noises. Clipboard and Gibberish are special types. Clipboard replaces the selection with audio currently in the clipboard. Use Copy in the Edit menu to copy audio to the clipboard before using Censor. Gibberish scrambles the selection by moving and reversing short sections of audio, making dialogue difficult to understand. |
| Censor volume (dB) | Sets controls the volume of the censored audio (the tone, clipboard, or gibberish). Usually this is set near full volume. |
| Source volume (dB) | Sets the volume of the original audio. Usually this is set to the lowest value (Off). |
| Crossfade time (s) | Sets how long it takes to fade from the original audio to the censored, which eliminates sudden transitions (possible clicks) between original to censored regions. Usually this is set to a small value. |
- Select the word by itself making sure no surrounding dialogue is selected.
- Choose Censor from the Effect menu.
- Select the "Beep" preset.
- Choose OK.
- Open the file containing the final dialogue.
- Use Copy on the Edit menu to copy it to the clipboard.
- Open the file containing the dialogue to be replaced.
- Select only the dialogue to be replaced. This must be the same length as the copied audio.
- Choose Censor from the Effect menu.
- Select the "Overwrite with clipboard" preset.
- Choose OK.
The copied dialogue must be exactly the same length as the replaced dialogue for it to be completely overwritten. If the clipboard audio is shorter, then the trailing end of the replaced dialogue will still be present. If the clipboard audio is longer, it will be truncated to fit in the selection. This effect does not alter the length of the selection. The timing of the surrounding audio is not affected, which maintains synchronization in music or video. Use Replace to replace a different size selection.
See Also: Mute, Overwrite, Replace, Presets
Doppler
- Doppler in the Effect menu.
- Doppler effect in the Add Effect window of Batch Processing.
A Doppler effect is defined as a change in frequency of a wave caused by motion. You often hear it when police or ambulance sirens drop in pitch as they pass near by.
Use Doppler to dynamically alter or bend the pitch of the selection altering the speed at which the waveform is played. Note that both pitch and tempo are changed.
Shape Controls allow the pitch/speed to be varied over the selection from 0.25 to 2.0 times normal. Use Shape Volume to dynamically alter the volume as well.
The "Slow down" preset gives you a good idea of what it sounds like when the batteries start to fail in a portable tape player. Other presets can change your voice to a chipmunk ("Faster") or a giant ("Slower").
See Also: Pitch, Time, Shape Volume, Presets
Dynamics
- Dynamics in the Effect menu.
- Dynamics effect in the Add Effect window of Batch Processing.
Use Dynamics to alter the amplitude mapping of the selection. It can limit, compress, or expand a range of amplitudes. The amplitude mapping is set using Shape Controls, where x-axis and y-axis both have a range of -1 to 1. When the line stretches diagonally from the lower left corner to the upper right corner, the input amplitude (x) and output amplitude (y) are the same for every point on the line. By changing the line, the output will differ from the input. Figure: Dynamics
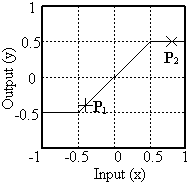
The figure above shows an example of amplitude mapping for clipping distortion. Point P1 has an input value of -0.4 and an output value of -0.4. Therefore no change occurs to the amplitude. Point P2 on the other hand, has an input value of 0.8 and an output value of 0.5. In this example, all input amplitudes in the range of -0.5 to 0.5 remain unchanged. Any values outside this range will be limited to ±0.5, so that the final sound will have no amplitude magnitudes greater than 0.5. Essentially, any values that are too high are "clipped" to fit within the range.
In practical terms, dynamics can increase the volume of quiet sections of a sound without greatly increasing the loud sections as well. It can introduce mild or heavy distortion effects (such as the "Blare" or "Hiss noise" preset).
See Also: Auto Gain, Compressor/Expander, Presets
Echo
- Echo in the Effect menu.
- Echo effect in the Add Effect window of Batch Processing.
Use Echo to create an echo or reverb effect in the selection. The settings include number of echoes, echo delay, echo volume, feedback, stereo, and tail generation.
| Echo Settings | |
|---|---|
| Setting | Description |
| Echoes | Sets the number of times the sound is repeated and mixed at a diminished volume with the given Delay. |
| Delay (s) | Sets the amount of time it takes for the first echo to be heard. If more than one echo is used, then each subsequent echo delay is compounded by this amount again. In other words, the second echo is delayed twice as long, the third echo is delayed three times as long, and so on. |
| Volume (dB) | Sets the loudness of the first echo. The volume of subsequent echoes is compounded in the same way the delay is. Usually values should be less than -6dB. |
| Feedback (dB) | Sets the loudness of the feedback. Feedback makes an echo sound deeper and richer by regenerates each echo, and the echo of those echoes, and so on, creating many more echoes than before. |
| Stereo | Causes the echo to bounce between the left and right channels. |
| Generate tail | Adds some silence to the end of the selection so that the trailing, fading echoes can be stored. This increases the length of the sound. Turn this setting off if you do not want to change the length of the selection or have any silence inserted. If the setting is off, echoes will end abruptly rather than trailing off gradually. |
See Also: Flanger, Reverb, Presets
Compressor/Expander
- Compressor/Expander in the Effect menu.
- Compressor/Expander effect in the Add Effect window of Batch Processing.
The Compressor/Expander effect dynamically alters the audio volume level. It is commonly used as a compressor, limiter, expander, or gate.
This effect does not change the size of the file. For file compression, use Save As on the File menu and change the type and attributes.
Compressors and limiters are used to decrease or limit the dynamic range of audio. In simple terms, they reduce the volume of loud sounds while leaving the rest of the sound unchanged. Expanders and gates are used to increase the dynamic range of audio. They reduce or eliminate quiet sections while leaving louder sections unchanged, which can help to reduce background noise.
Compressors always work on loud sections and expanders always work on quiet sections. Normally, both compressors and expanders only reduce the volume. However, GoldWave also allows you to boost the volume.
| Compressor/Expander Settings | |
|---|---|
| Setting | Description |
| Multiplier (dB) | Sets the amount of volume change. It is the scale factor applied to the sound when the threshold is met. For compressors, it is the amount to scale the loud sections. For expanders, it is the amount to scale the quiet sections. Normally a value less than 0dB should be used to reduce the volume. |
| Threshold (dB) | Sets the audio level to activate the expander or compressor. Compressors scale the volume level of all sounds above that level. Expanders scale the volume level of all sounds below that level. |
| Attack (s)
Release (s) | Set the amount of time required to fully activate the effect. An Attack value of 0.100 means that the audio level will have to cross the threshold for at least one tenth of a second before the multiplier is used at full strength. A Release value of 0.100 means the multiplier will continue to be used for one tenth of a second after the audio level no longer crosses the threshold. |
| Expander
Compressor | Sets the type of processing required. Use Expander to change volumes of quiet sounds. Use Compressor to change volumes of loud sounds. |
| Anticipate attack | Scans ahead for audio that crosses the threshold and activates the effect. If the Attack time is set to 0.100, then the effect scans ahead by 0.100 seconds. This means that the multiplier will be at full force the instant the threshold is crossed rather than building to full 0.100 seconds later. |
| Use smoother | Smoothes out any sudden volume changes which may occur during processing with small attack/release times. |
| Process channels independently | Controls how each channel is processed. When checked, each channel is processed separately and different gains may be applied to each channel. When unchecked, one gain is applied to all channels, usually the lowest to avoid clipping. |
Compressor Example
You have recorded some music that has a few loud moments, but you want to raise the overall volume without distorting the loud parts. Select the "Reduce loud parts" preset. After compression, use the Maximize Volume effect to stretch the volume to the full dynamic range. Alternatively you could use the "Boost quiet parts" preset.
Expander Example
You have recorded someone talking and notice background noise during the quiet parts. To reduce the noise, select the "Noise gate" preset or the "Reduce quite parts" preset.
See Also: Auto Gain, Dynamics, Presets
Filter Menu
Filter item in the Effect menu.Filters are used to remove a range of frequencies or amplitudes from a sound and can produce a variety of effects. The submenu contains several filter related effects.
Auto Offset Removal
- Auto Offset Removal in the Effect | Filter menu.
- Auto Offset Removal effect in the Add Effect window of Batch Processing.
Use Auto Offset Removal automatically remove a vertical shift or dc offset in the waveform. Offsets occur when audio is wired through several external devices that do not share a common ground. Computers with integrated sound hardware often have significant offsets as well. If the waveform is constantly above or below zero during silence, then it has an offset that must be removed. Offsets can cause pops and clicks between edit points and other problems.
Unlike Offset, this effect does not need to scan the entire selection and offsets cannot be set to specific values. Values to cancel out existing offsets are automatically calculated and used. Even varying offsets are removed.
| Auto Offset Removal Setting | |
|---|---|
| Setting | Description |
| Duration for offset calculation (s) | Sets the length of time to analyze the audio for an offset. For constant, stable offsets, set this value to the maximum. For fluctuating offsets, use lower values. |
See Also: Offset, Dynamics, Presets
Bandpass/stop
- Bandpass/stop in the Effect | Filter menu.
- Bandpass/stop effect in the Add Effect window of Batch Processing.
Bandpass filters block all frequencies outside a specified range, keeping only frequencies within the range. Bandstop filters block all frequencies within a specified range, keeping all other frequencies outside the range.
| Bandpass/Stop Settings | ||
|---|---|---|
| Group | Setting | Description |
| Initial frequency range | From (Hz),
To (Hz) | Sets the initial frequency range of the pass or stop band. |
| Final frequency range | From (Hz),
To (Hz) | Sets the final frequency range of the pass or stop band. The band range fades from the initial setting to the final setting over the length of the selection. Dynamics must be checked to set these values. |
| Settings | Bandpass,
Bandstop | Sets the type of filter to use. Select Bandpass to keep only the frequencies within the range. SelectBandstop to block all the frequencies in the range. |
| Static,
Dynamic, Steepness | See Low/Highpass filter for details. | |
- Set From to 200.
- Set To to 3800.
- Choose the Bandpass option.
- Choose the Static option.
- Set Steepness to 10 or higher.
- Choose OK.
See Also: Low/Highpass, Equalizer, Noise Reduction, Spectrum Filter, Presets
Equalizer
- Equalizer in the Effect | Filter menu.
- Equalizer effect in the Add Effect window of Batch Processing.
Equalizers are commonly found on stereo systems. They boost or reduces certain ranges of frequencies. Simple equalizers control only treble and bass. GoldWave's equalizer controls 7 bands.
Center frequencies for each of the 7-bands are given at the top of each fader. Adjust the faders to boost or reduce a band between +12dB to -24dB.
To change bass, adjust the two or three left-most bands. To change treble, adjust the two or three right-most bands. Several presets are included to demonstrate bass, mid, and treble changes.
More detailed equalization is possible using the Spectrum Filter or Parametric EQ.
See Also: Low/Highpass, Equalizer, Noise Reduction, Spectrum Filter, Presets
Low/Highpass
- Low/Highpass in the Effect | Filter menu.
- Low/Highpass effect in the Add Effect window of Batch Processing.
Lowpass filters block high pitched, frequencies (treble) but allow low pitched frequencies (bass) to pass. They can be used to reduce high end hiss noise or remove unwanted sounds above the given cutoff frequency. If you were to apply a lowpass filter with a cutoff frequency of 1000Hz on speech, it would make it sound muffled and deep. Lowpass filters can also be used to eliminate aliasing noise when used before downsampling.
Highpass filters block low pitch frequencies, but allow high pitched frequencies to pass. They can remove deep rumbling hum or remove unwanted sounds below the given cutoff frequency. If you were to apply a highpass filter with a cutoff frequency of 1000Hz on speech, it would make it sound thin and hollow.
| Low/Highpass Settings | ||
|---|---|---|
| Group | Setting | Description |
| Cutoff frequency | Initial cutoff (Hz) | Sets the constant cutoff frequency for static filtering or the initial frequency for dynamic filtering. |
| Final cutoff (Hz) | Sets the cutoff frequency at the end of the selection, allowing you to fade from one cutoff to another over the selection. Dynamics must be checked to set this value. | |
| Settings | Lowpass,
Highpass | Sets the type of filter to use. Select Lowpass to keep only the frequencies below the cutoff frequency. Select Highpass to keep only the frequencies above the cutoff frequency. |
| Static,
Dynamic | Sets whether the filter is constant or changing. Select Static to keep the cutoff frequency constant throughout the selection during processing. Select Dynamic to fade the cutoff frequency from the initial value to the final value over the duration of the selection. | |
| Steepness | Sets how sharply the filter cuts off frequencies outside the cutoff frequency. A higher steepness makes the filter sharper, but it also increases processing time. In technical terms, the steepness specifies the number of second order cascade filters used. | |
- Set Initial cutoff to 60.
- Choose Dynamic.
- Set Final cutoff to 1000.
- Choose Highpass.
- Choose OK.
- Set Initial cutoff to 4000.
- Choose Lowpass.
- Choose Static.
- Set Steepness to 20.
- Choose OK.
See Also: Bandpass/Stop, Equalizer, Noise Reduction, Spectrum Filter, Presets
Noise Gate
- Noise Gate in the Effect | Filter menu.
- Noise Gate effect in the Add Effect window of Batch Processing.
Use Noise Gate to reduce or eliminate noise in quiet or silent parts of a recording. Brief noises, such as mouse clicks or microphone bumps can be muted as well. A noise gate cannot remove noise from louder parts of the recording. Use Noise Reduction for that instead. To completely delete silences from a recording, use Silence Reduction.
Use Maximize Volume before using this effect to ensure volume is optimal for the presets.
| Noise Gate Settings | ||
|---|---|---|
| Setting | Description | |
| Threshold (dB) | Sets the level of audio that is considered noise. Audio below the threshold is reduced. The threshold should be set as low as possible so that only noise is removed. If the threshold is set too high, short and quiet sections of audio may be muted too. | |
| Attack (s) | Sets the amount of time required to fade out to complete silence when the audio is below the threshold. | |
| Release (s) | Sets the amount of time required to fade in to full volume when the audio rises above the threshold again. | |
| Reduction (%) | Sets the level of reduction in the quiet parts. Normally this value would be set to 100 to replace the quiet parts with complete silence. A value of 25 reduces the noise only slightly (-3dB). | |
| Ignore (s) | Sets the duration of brief sounds to ignore, even if they are above the threshold. Any sound less than this duration is muted. Use this to remove clicks, pops, and other very short sounds. Set this to zero to ensure that all sounds above the threshold are retained. | |
See Also: Noise Reduction, Silence Reduction, Presets
Noise Reduction
- Noise Reduction in the Effect | Filter menu.
- Noise Reduction effect in the Add Effect window of Batch Processing.
Noise Reduction uses frequency analysis techniques to remove unwanted noise, such as a background hiss, a power hum, or any continuous, consistent sound. It cannot be used to separate or remove complex or brief sounds, such as coughs, laughter and applause. It cannot remove instruments or vocals from music.
If the noise to be removed contains pops and clicks, use Pop/Click to eliminate those before using Noise Reduction. Any pops or clicks in the noise profile/envelope may cause a significant reduction in quality.
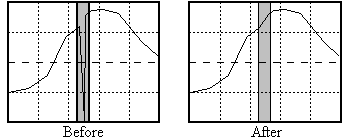
A frequency analysis window with Shape controls displays frequency in Hertz on the x axis and frequency magnitudein decibels on the y axis. Figure: Noise Reduction

The frequency analysis provides graphical information about all frequencies within the sound at the given Time. For multichannel sounds, each channel is shown it's own colour. Moving the scroll bar located below the analysis window changes the time, showing the frequency analysis of a different part of the sound. The detail of the analysis depends on the FFT size setting, explained below.
Noise is removed using a reduction envelope. The shape of the envelope must closely match the shape of the noise to remove. The frequency analysis graph can help determine that shape. Change the analysis time so that it coincides with a time in the sound where only the noise is heard (use the Preview button to play the file to find such a place and time). Once you have isolated the noise in the analysis graph, you can then create the envelope.
The envelope can be created in four different ways, depending on the eeduction envelope setting. Use clipboard (see below) generally gives the best results, but requires copying the noise to the clipboard before using Noise Reduction. Also try the presets.
| Noise Reduction Settings | |||
|---|---|---|---|
| Group | Setting | Description | |
| Reduction envelope | Use shape | Creates an envelope based on the shape defined by the Shape Controls. Click the mouse in the analysis graph to draw the shape. A simple horizontal line at about 80dB removes a quiet hiss from a sound. In some cases, you'll need to trace the outline of the analysis graph or draw completely different shapes to reduce the noise. | |
| Use current spectrum | Creates an envelope based on the shape of the graph shown in the frequency analysis window. Use this to remove a complex buzz or hum. The analysis Time must be set to a place where the noise is heard by itself. | ||
| Use average | Creates an averaging envelope throughout noise reduction processing. The envelope is continuously updated, based on the average frequency analysis of the sound. Use this setting if the noise changes frequently throughout the sound. | ||
| Use clipboard | Creates an envelope based on an analysis of the waveform in the clipboard. This is the most flexible option and usually gives the best results. Before you can use this option, you must Copy a piece of noise into the clipboard. The piece must contain only the noise to be removed from the rest of the file. The noise can even be copied from a different file. After copying the noise, remember to change the selection to the part of the file you want to apply the noise reduction. | ||
| Shape controls | Point,
X, Y, Time | See Shape Controls. | |
| Settings | FFT size | Sets the detail of the frequency analysis and the noise reduction envelope. Usually values of 11 or higher give the best results. See FFT Settings in Effects Overview for more information. | |
| Overlap | Sets the amount of audio to overlap from one calculation to the next. A value of 4x works well. See FFT Settings in Effects Overview for more information. | ||
| Scale (%) | Sets reduction envelope scale. A value of 100 uses the envelope as it is. A value of 200 doubles the envelope amplitude, which doubles the amount audio removed from the sound. A value of 50 halves the envelope amplitude, which halves the amount removed. Normally it should be set to 100. | ||
| Output noise only | Makes the effect perform the exact opposite of noise reduction so that only the noise remains in the output. This is useful when previewing the effect to hear what is actually being removed from the audio. Do not check this box when removing noise. | ||
See Also: Equalizer, Spectrum Filter, Presets
Parametric EQ
- Parametric EQ in the Effect | Filter menu.
- Parametric EQ effect in the Add Effect window of Batch Processing.
A parametric equalizer (shown below) is a flexible tool for reducing or enhancing ranges of frequencies. GoldWave presents an easy to use interface where all the parameters for up to 40 bands can be configured quickly. Presets contain some commonly used templates. Figure: Parametric Equalizer

Graph window
The graph shows frequency on the x-axis in Hertz and the gain on the y-axis in decibels. Each enabled band is displayed in the graph as a diamond shaped box located at its center frequency and gain. The width of the box shows the bandwidth. The currently selected band is shown in blue and its exact settings are given in edit box controls.
A short time frequency analysis graph is drawn with the left channel in green and the right channel in red. The time of the analysis can be changed using the scroll bar located at the bottom of the graph. The analysis helps determine what frequencies to boost or reduce. A high pitched squeal, for example, would appear as a spike near the right side of the graph. Whereas a low pitched hum would be a spike or bump near the left side.
Controls
A band is configured by selecting its number from the Band box and adjusting the Gain, Width, and Center faders. A quicker method is to drag-and-drop the band to a new location on the graph. Note that because of the logarithmic frequency scale, the width of a diamond changes as you move it left or right. The bandwidth, however, remains constant.
Use the diamond plus button to add more bands. Use the diamond minus button remove existing bands. The current (blue) band given in the Band box is the one removed.
The "Notch" preset is effective for removing a simple tone from a sound, such as a 60Hz hum or telephone dial tones. The "Bass boost" and "Treble boost" presets work the same way as the bass and treble controls on a stereo system. Adjust the gain up or down to control them.
See Also: Equalizer, Noise Reduction, Spectrum Filter, Presets
Pop/Click
- Pop/Click in the Effect | Filter menu.
- Pop/Click effect in the Add Effect window of Batch Processing.
A pop/click filter is a specially designed filter that searches for abrupt changes in the sound and eliminates them. Such a filter is often used to remove pops and clicks caused by dust and scratches when recording old vinyl records.
When a click is detected, the filter attempts to reconstruct the damaged waveform based on the surrounding waveform shape making the repair almost imperceptible. However with excessive pops and clicks or at low tolerance levels, reconstructed waveforms may overlap and sound distorted. The tolerance setting should be kept as high as possible. Using a very low setting may introduce more distortion than existed in the original. This is most noticeable in voice recordings and instrument solos, particularly trumpet solos. Always start with the maximum tolerance setting for those types of sounds.
| Pop/Click Setting | |
|---|---|
| Setting | Description |
| Tolerance (%) | Sets how abrupt a change in amplitude can be before it is considered a click. It is best to start with a value of 1000% or higher. Using a lower value will detect more clicks, but may eliminate natural clicks such as drum sticks tapping together or a conductor tapping the baton. Values less than 500% should be used on short selections only. |
The filter requires a minimum selection of 4000 samples (about one tenth of a second at CD quality) to establish a baseline. Using the filter on a shorter selection has no effect.
See Also: Noise Reduction, Find, Presets
Silence Reduction
- Silence Reduction in the Effect | Filter menu.
- Silence Reduction effect in the Add Effect window of Batch Processing.
Use Silence Reduction to automatically remove silences from a sound. Use it to save storage space or to remove long pauses in speeches or police/airport radio recordings. Noise Reduction and Maximize Volume are recommended before using this effect to ensure a consistent silence level.
| Silence Reduction Settings | |
|---|---|
| Setting | Description |
| Silence threshold (dB) | Sets the volume level for the silence. Any audio below this level is considered silence and is subject to removal, provided it has a long enough duration. The Duration specifies how long the silence must be before it is reduced. Any silences short than this remain unchanged. |
| Duration (s) | Specifies how long the silence must be before it is reduced. Any silences shorter than this remain unchanged. |
| Reduce to (%) | Sets the length of the reduced silence relative to its original length. A value of 75, for example, reduces a 10 second silence to 7.5 seconds. |
| Maximum length (s) | Sets the maximum length for reduced silences. This setting overrides the Reduce to setting if the reduced length still exceeds the maximum. If this is set to 5 seconds in the above example, then the 10 second silence is reduced to 5 seconds. |
| Full crossfade | If is checked, the ends of the audio where silences were removed are gradually crossfaded over the entire length the remaining silence. If unchecked, a short crossfade of one-tenth of a second is used to join together non-silent sections where silences were removed. If there is a high level of background noise that varies, then full crossfade is recommended. However, if you hear unexpected overlapping fragments after removing silences, then this option should not be used. |
See Also: Find, Trim Silence, Noise Gate, Presets
Smoother
- Smoother in the Effect | Filter menu.
- Smoother effect in the Add Effect window of Batch Processing.
Use Smoother to reduce hiss and crackle.
| Smoother Setting | |
|---|---|
| Setting | Description |
| Length | Sets the length of the smoother filter, which is the number of samples to be averaged. The larger the value, the more averaging is applied to the audio and the duller it will sound. |
| Volume | Increases the volume of the processed audio to offset the the loss caused by averaging. Larger Length values require a higher volume. |
See Also: Pop/Click, Noise Reduction, Presets
Spectrum Filter
- Spectrum Filter in the Effect | Filter menu.
- Spectrum Filter effect in the Add Effect window of Batch Processing.
A spectrum filter is a general purpose audio filter similar to Parametric EQ, but with much greater control. Instead of using individual bands, the entire frequency spectrum is controlled using Shape Controls to adjust the gain. This allows many kinds of filters to be designed, such as lowpass, highpass, bandpass, bandstop, notch, peak, comb, and more. Filtering is performed in the frequency domain using Fast Fourier Transforms (FFTs).
A spectral analysis window displays a shape line and several other controls. The X and Y coordinates are updated when you click-and-drag a shape point. The X coordinate is the frequency in Hertz and the Y coordinate is the magnitude in decibels. The time of the spectral analysis shown is given in the Time box. Moving the time scroll bar, located below the analysis window, changes the graph to show the spectral analysis of a different part of the sound. Each channels is shown in a different colour.
Master gain sets the overall gain of the filter, which is equivalent to shifting the entire shape up or down.
Initially the shape line is horizontal at 0dB, which means that no changes in gain are made at any frequency. Alter the shape line up or down to increase or decrease the gain at a particular frequency. In technical terms, the shape line represents the frequency response function.
| Spectrum Filter Settings | ||
|---|---|---|
| Group | Setting | Description |
| Graph range | Min (dB) | Sets the lower range of the y axis of the graph. |
| Max (dB) | Sets the upper range of the y axis of the graph. Setting Min to -5 and Max to 5, for example, sets the graph to show a narrower range between -5dB to 5dB, allowing shape points to be set more precisely with the mouse within that range. | |
| Settings | FFT size | Sets the detail of the spectral analysis and the resolution of the filter. Higher settings provide a higher resolution, allowing the filter to follow the shape more accurately, with sharper cutoffs. When processing high sampling rate files, such as 88kHz or 192kHz, the FFT size must be set higher for the filter to follow the shape. Using too high a value may cause overshoot and oscillations in the gain (Gibbs phenomenon) |
| Overlap | Sets the amount of audio data to overlap from one calculation to the next. The lowest value gives the fastest processing and generally works well. | |
See Also: Equalizer, Noise Reduction, Parametric EQ, Presets
Flanger
- Flanger in the Effect menu.
- Flanger effect in the Add Effect window of Batch Processing.
A flanger effect is similar to an echo effect in that the original sound is mixed with a delayed copy of itself. Unlike an echo, where the delay is constant, a flanger varies the delay over a given range. The speed, or frequency, at which the delay varies is controlled as well. The Flanger effect presents a window where you can set the depth, frequency, and fixed delay parameters and control how the sound is mixed. Many presets are included to demonstrate the kinds of unusual audio effects that are possible.
| Spectrum Filter Settings | ||
|---|---|---|
| Group | Setting | Description |
| Volumes | Source (%) | Sets the volume of the original sound to mix with the final sound. A value of 0 means the original sound will not be mixed at all with the final sound. If this value is set to 100 and all other volumes are 0, no change is made to the sound. A value of -100 inverts the source, which is equivalent to subtracting the original instead of adding it to the final sound. |
| Flanger (%) | Sets the volume of the delayed sound to mix with the final sound. Usually, this value should be in the range of 25 to 100, or -25 to -100 for an inverted mix. | |
| Feedback (%) | Set the level of feedback (previously generated output) to mix with the final sound. This makes the effect more full and pronounced. Set this value to 0 if you do not want any feedback. In general the feedback should be set to between -75 to 75. | |
| Stereo | Makes the flanger and feedback audio alternate between the left and right channels, giving a more pronounced stereo effect. | |
| Frequency modulator / vibrato | Variable delay | Sets the maximum variable delay in milliseconds. A value of 40 causes the delay to vary from 0 to 40 milliseconds. |
| Frequency | Sets the speed at which the delay varies. A value of 2 will vary the delay over from 0 to its maximum twice a second. For a value of 0.2, the maximum delay is reached every five seconds. | |
| Fixed delay | Sets a constant delay that is added to the Variable delay to change the minimum delay. If the variable delay is 40 and the fixed delay is 10, the delay will vary from 10 to 50 milliseconds. | |
| Sine modulator,
Triangular modulator | Sets the function for varying the delay. Select Sine to vary the delay on a sinusoidal pattern. Select Tiangular to vary the delay on a simple linear pattern. | |
| Volume modulator / tremolo | Depth (%) | Set the relative amount to vary the flanger volume. If Flanger volume is 80%, for example, a depth of 100% varies the volume from 0% to 80%. A Depth of 25% varies it from to 60% to 80%. |
| Frequency | Sets the speed at which the volume varies. A value of 2 will vary the volume over its depth twice a second. For a value of 0.2, the full depth is reached every 5 seconds. | |
| Sine modulator,
Triangular modulator | Sets the function for varying the volume. Select Sine to vary the volume on a sinusoidal pattern. Select Tiangular to varys the volume on a simple linear pattern. | |
See Also: Echo, Reverb Presets
Frequency Blend
- Frequency Blend in the Effect menu.
- Frequency Blend effect in the Add Effect window of Batch Processing.
Frequency Blend combines past frequencies and pitch shifted frequecies to generate unique audio effects, such as a sustained reverb effect or a pitch echo effect where the pitch continously increases or decreases over time.
| Frequency Blend Settings | |
|---|---|
| Setting | Description |
| Pitch shift (%) | Sets the amount of pitch shifting. A value of 50% shifts the pitch down one octave. A value of 200% shifts the pitch up one octave. This shift is applied to the feedback loop, causing a continuous shift over time, provided the feedback volume is not too low. |
| Feedback | Sets the volume of the pitch shift feedback. A volume near 0dB generates a continuous pitch shift over time. Using the lowest setting generates a single, fixed pitch shift. |
| Sustain | Sets the rate at which frequencies are blended over time. A value of 0 disables blended frequencies. Higher values slow down the rate of change of frequencies, which may enhance harmonics or extend stronger frequencies over time. |
| From To | Sets the range of frequencies affected. Use this to limit the sustain or pitch shift to a narrower range of frequencies. |
| Wet volume | Sets the volume of the processed audio mixed with the final output. |
| Dry volume | Sets the volume of the original audio mixed with the final output. |
See Also: Doppler, Pitch, Reverb, Presets
Interpolate
- Interpolate in the Effect menu.
- Interpolate effect in the Add Effect window of Batch Processing.
Interpolate (see figure below) uses linear interpolation to smooth out the waveform within the selection. Use Interpolate only on a tiny selection to remove a pop or click. Do not use on a large selection. Figure: Interpolate
Invert
- Invert in the Effect menu.
- Invert effect in the Add Effect window of Batch Processing.
Invert reflects the selection about the time (horizontal) axis. The selection is essentially turned upside-down. This produces no noticeable effect in mono sounds and has a slight effect in stereo sounds. Inverting a single channel of a stereo sound produces an "in" or "out" effect.
Inverting can be used before mixing so that the two sounds are subtracted instead of added.
See Also: Channel Mixer, Dynamics, Channel Menu
Mechanize
- Mechanize in the Effect menu.
- Mechanize effect in the Add Effect window of Batch Processing.
Mechanize gives a robotic or mechanical characteristic to a sound through a method known as amplitude modulation. This effect was widely used in old science fiction movies. The rate of modulation is controlled with the Frequency value. The sound is modulated with one of several waveforms given in the table.
| Mechanize Modulator Options | |
|---|---|
| Waveform | Purpose |
| Sine | The sound is modulated with a sinusoid, which tends to shift the pitch and cause distortion. Using a very small frequency value (less than 2.0) causes the sound to fade in and out. |
| Triangle | The sound is modulated with a triangular wave. This is similar to the Sine modulator but causes more distortion at higher frequencies. |
| Square | The sound is modulated with a raised square wave, with amplitudes ranging from 0.0 to 1.0. This causes very heavy distortion at high frequencies and intermittent (on/off) audio at low frequencies. |
| Clipboard | The sound is modulated with audio stored in the clipboard. Audio must be copied to the clipboard before using this option. No attempt is made to convert the clipboard audio to a compatible sampling rate. |
Multichannel Mixer
- Multichannel Mixer in the Effect menu.
- Multichannel Mixer effect in the Add Effect window of Batch Processing.
Multichannel Mixer swaps, mixes, or combines channels. Each channel has a group of controls where the volume level of every channel can be set. Presets include multichannel mixdown, channel swapping, front to back swapping, and more.
After mixing, use Maximize Volume to ensure the audio has no clipping, but has full dynamic range.
| Channel Mixer Settings | ||
|---|---|---|
| Setting | Description | |
| Channel group | Contains a set of volume (%) controls for setting the mix levels of every channel. | |
See Also: Channel Mixer, Pan, Balance fader, Presets
Offset
- Offset in the Effect menu.
- Offset effect in the Add Effect window of Batch Processing.
Offset adjusts or removes a dc offset in the selection by shifting it up or down so that the wave is centered on the horizontal axis. If you notice that silent sections of a sound are not at zero in the waveform, use this effect to adjust them to zero. Figure: Offset
Positive values shift the graph up and a negative values shift it down. Use the Scan Offset button to automatically calculate the offset to use to remove any existing offset. After scanning completes, the value for each channel is set such that it will cancel out the offset in that channel. If the value is zero, then no offset was detected.
Any offset should be removed to minimize pops/clicks during editing. Offsets may interfere with other effects as well.
You should check the offset from time to time after processing effects. Otherwise, the offset may increase with each effect, resulting in some distortion.
See Also: Dynamics, Filter dc offset during recording, Presets
Pitch
- Pitch in the Effect menu.
- Pitch effect in the Add Effect window of Batch Processing.
Pitch changes the pitch (frequency) of the selection. This is useful for converting instrument samples from one note to another. The new pitch is specified using a scale factor or using semitone and fine tune values.
| Spectrum Filter Settings | |
|---|---|
| Setting | Description |
| Scale (%) | Sets the relative pitch by a percentage value. A value of 50% is equivalent to a downward shift by one octave. A value of 200 is equivalent to an upward shift of one octave and would make a voice sound like a chipmunk. A value of 75 would make a woman's voice sound like a man's. |
| Semitone,
Fine tune | Sets the relative pitch in semitones (notes on a piano). Given a tone at middle C, a the semitone value of 2 changes the tone of D. A value of -1 changes the tone to B. A value of 12 makes the note one octave above middle C.
Fine tune sets a slight pitch adjustment in hundredths of a semitone. For example, a value of 50 changes a note from C to halfway between C and C#. |
| Preserve tempo | If selected, a different, more complex algorithm is used to keep the length and tempo the same. In terms of a voice recording, this changes the pitch of the voice without changing the speed at which the words are spoken. This option requires a substantial amount of processing time and will affect the quality of the sound.
For information on the FFT size and Overlap, see FFT Settings. |
Higher quality pitch changes may be possible using Time. Try the "Similarity pitch up" or "Similarity pitch down" presets in the Effect Chain Editor tool.
See Also: Doppler, Frequency Blend, Playback Rate, Time, Presets
Plug-in Menu
The Plug-in submenu lists all installed and enabled plug-ins. DirectX and VST plug-ins are listed under DirectX and GWVST32 submenus if installed.
GoldWave checks for new plug-ins only during startup, so if a new plug-in is installed, you must restart GoldWave for it to be detected.
See Also: Effect Plug-ins, Options | Plug-in | Effect
Reverse
- Reverse in the Effect menu.
- Reverse effect in the Add Effect window of Batch Processing.
This command reverses the selection so that it plays backward. Now you have an easy way to capture all those "satanic verses" or reverse speech messages. The Rewind  button on the Control window plays backwards as well, without processing the file.
Reverb
- Reverb in the Effect menu.
- Reverb effect in the Add Effect window of Batch Processing.
Reverb adds fullness and richness to the sound by simulating the acoustic reverberation and echoes within a chamber or room.
| Reverb Settings | |
|---|---|
| Setting | Description |
| Reverb time | Sets the size of the reverb. A longer time simulates a larger chamber or room. |
| Volume (dB) | Sets the loudness of the reverb. Values less than -18dB give good results. |
| Delay scale | Sets the delay of the reverb for fine tuning. Use 1.0 for a standard reverb. |
See Also: Echo, Flanger, Presets
Stereo Menu
Stereo in the Effect menu.The Stereo submenu contains effects for stereo or multichannel files, such as swapping channels and left/right panning.
Channel Mixer
- Channel Mixer in the Effect | Stereo menu.
- Channel Mixer effect in the Add Effect window of Batch Processing.
Channel Mixer swaps, mixes, inverts, or combines the left and right channels in a variety of ways. The left and right channels are replaced with a mixed combination of both channels, depending on the volume levels. All selected left and right channels of a multichannel file are processed in pairs. The Center and LFE channels are not affected.
| Channel Mixer Settings | ||
|---|---|---|
| Group | Setting | Description |
| Left channel | Left volume (%) | Sets the percentage of volume of the original left channel to mix in the final left channel. |
| Right volume (%) | Sets the percentage of volume of the original right channel to mix in the final left channel. | |
| Right channel | Left volume (%) | Sets the percentage of volume of the original left channel to mix in the final right channel. |
| Right volume (%) | Sets the percentage of volume of the original right channel to mix in the final right channel. | |
- In the Left channel box, set the Left volume fader to 0 and the Right volume fader to 100.
- In the Right channel box, set the Left volume fader to 100 and the Right volume fader to 0.
- Choose OK.
See Also: Reduce Vocals, Pan, Balance fader, Presets
MaxMatch
- MaxMatch in the Effect | Stereo menu.
- MaxMatch effect in the Add Effect window of Batch Processing.
MaxMatch automatically balances the left and right channels and maximizes the volume levels. Essentially, this effect uses the Match Volume effect internally on the left and right channels, then uses the Maximize Volume effect. After processing, the left and right channels will have the same average volume level and at least one channel will have full dynamic range (1.0 or 0dB).
Note that it is rarely possible for all channels to have the same average and full dynamic range at the same time. Most channels will have a dynamic range of slightly less than 1.0 or 0dB.
Pan
- Pan in the Effect | Stereo menu.
- Pan effect in the Add Effect window of Batch Processing.
Pan uses Shape Controls to dynamically adjust the stereo balance of the sound. The shape graph is divided into green and red regions, representing the left and right channels respectively. All selected left and right channels are processed in pairs. The shape line, initially located between the regions, is the center for panning. Bend and/or move the line to dynamically alter the balance. The figures below show a couple of examples of panning shapes.
Figure: Pan from left to right

|
Figure: Pan from left center to right center
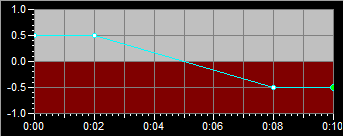 |
There are two end points on the pan shape line by default. Use the Point box to select the point to edit. The X and Y values control the location of the selected point. X is the time and Y is the amount of panning. A positive Y value pans to the left. A negative value pans to the right. For end points, only Y can be changed. X is fixed at the beginning and ending of the selection. To pan from right to left over the selection:
- Select point 1 and set Y to -1.0 to make panning start at full right.
- Select point 2 and set Y to 1.0 to make panning end at full left.
- Choose OK.
Use the Add Point button to insert a new point between the two end points. Note that the point numbers change, with point 3 as the end point and point 2 as the new one. Both the X and Y values can be changed for that point. To make panning go slightly left at 10 seconds into the file, for example, set X to 10.0 and Y to a positive value, such as 0.25. When adding points, be sure to select the point after which you want to insert the new point. The X value for each point is confined to adjacent points.
Show balance calculates and displays the current peak balance in yellow on the graph. For a typically stereo song, a spiked line roughly centered around zero would appear. For a 2 channel mono file, it would be a perfectly flat line at zero. For an unbalanced file, the line would be above or below zero.
Change volume only limits the pan effect to volume changes only. Normally panning mixes the left and right channels to alter the balance. This setting prevents any mixing and only changes the relative volumes of the channels.
See Also: Shape Volume, Balance fader, Presets
Reduce Vocals
- Reduce Vocals in the Effect | Stereo menu.
- Reduce Vocals effect in the Add Effect window of Batch Processing.
Reduce Vocals reduces vocals in stereo recording by subtracting the left and right channels and by using a bandstop filter. A true stereo file is required with mono vocals in the left and right channels. Any variation of the vocals in the left and right channels prevents perfectly removal. Any instruments that are identical in the left and right channels are removed as well.
To extact the vocals and remove the music, use Stereo Center instead.
| Reduce Vocals Settings | ||
|---|---|---|
| Group | Setting | Description |
| Channel cancellation volume | Volume (dB) | Sets the volume of the subtracted channels in the final output. |
| Bandstop filter volume and range | Volume (dB) | Sets the volume of the bandstop filter in the final output. This is mixed with the subtracted channels to restore some of the stereo music. |
| From (Hz),
To (Hz) | Sets the range of the bandstop filter. A narrow range retains more of the music, but removes less of the vocals. A wider range retains less of the music, but removes more of the vocals. | |
Usually subtracting the left and right channels destroys the stereo sound, giving mono output. By using the bandstop filter, the effect is able to retain some of the low and high end stereo, enhancing the output.
Try the presets to learn what the different settings do.
See Also: Channel Mixer, Stereo Center, Presets
Stereo Center
- Stereo Center in the Effect | Stereo menu.
- Stereo Center effect in the Add Effect window of Batch Processing.
Stereo Center uses a frequency based method to separate vocals from music or to separate the perceived stereo center subchannel from the side subchannels and allows independent volume control of all subchannels.
| Stereo Center Settings | ||
|---|---|---|
| Group | Setting | Description |
| Center channel | Volume (dB) | Sets the volume of the perceived center subchannel, which usually is the vocals. To keep the vocals and remove the side subchannels, set this volume to 0.0dB and the side subchannel volumes below to -100dB (off). |
| From (Hz),
To (Hz) | Sets the range of the filter used to extract the center subchannel. Any frequencies outside the range are excluded from the center subchannel. To retain bass and treble when adjusting the volume of the vocals, use a range from about 200Hz to 12500Hz. | |
| Side channels | Left (dB) | Sets the volume of the left side subchannel. |
| Right (dB) | Sets the volume of the right side subchannel. | |
| FFT Settings | FFT Size,
Overlap | See FFT Settings. |
- Set Volume to 0.0dB.
- Set From to its minimum and To to its maximum.
- Set Left and Right to -100dB (off).
- Choose OK.
- Set Left and Right to 0.0dB.
- Set Volume to -100dB (off).
- Choose OK.
Credit: Part of this effect uses a method by the developer of virtualdub.
See Also: Channel Mixer, Reduce Vocals, Presets
Time
- Time in the Effect menu.
- Time effect in the Add Effect window of Batch Processing.
Time changes the playback speed or alters the tempo of the selection. This effect has many uses: it stretches or compresses a sound to fit in a certain time, it slows down instrumental music for easy transcription, or it changes the tempo of one musical passage to match rhythm and beats of another.
| Time Settings | |
|---|---|
| Setting | Description |
| Change (%) | Sets the relative change in time. A value of 50% slows down time, stretching the sound. A value of 200% speeds up time, shortening the sound. |
| Length (s) | Sets a new length for the selection. Use this to make a sound fit a certain time, such as squeezing a 35 second radio commercial into a 30 second spot. The new length must be from one quarter up to four times the original duration of the selection. Settings beyond that range cannot be processed. |
| Algorithm | Three different time altering algorithms are provided, each with certain advantages and disadvantages:
Speed simply changes the sampling rate of the entire selection so that it plays back at a different speed, similar to spinning a vinyl record faster or slower. It works the same way as the speed fader in the Control window, but in this case, the sound itself is changed. This technique is very fast and produces excellent quality, however, the pitch of the sound is changed as well. In other words, if you were to speed up a voice, the pitch becomes higher, making the voice sound like a chipmunk. Similarity uses correlation to add and overlap small, similar sections of the sound. This technique preserves the pitch. It generally produces high quality voice and fair quality music when using small speed or time changes. A fair amount of time may be require for processing, depending on the Search range value. For voice, the Window size should be set between 30 and 40 and the Search range set to between 10 and 20. For music, a larger Window size and Search range gives better results, such as 60 and 30. Larger Search range values increase processing time and echo. Low values increase gurgling noise. Overlap adjusts the amount of overlap between sections. Correlation is used to find the best matching sections to overlap, then the sections are crossfaded to reduce rough transitions from one section to the next. A value around 40% is recommended. Larger values may increase echo and significantly increase processing time. Values below 20% may cause distortion and gurgling due to shorter correlation and crossfade lengths. FFT uses Fast Fourier Transforms and interpolates or decimates the frequency analysis to change the length. This technique preserves the pitch, but can cause some echo artifacts in the sound. Best quality is obtained by using the Oscillator synthesis option, but that requires significant processing time. The FFT size should be set from 11 to 12 and the Overlap may be set to 4x for fastest processing, but 8x or 16x may give better quality. The FFT size and Overlap settings are explained in the Effects Overview section. |
If you changed the speed fader in the Control window, remember to set it back to 1.00 so that the device plays at the correct speed.
See Also: Doppler, Pitch, Playback Rate, Speed fader, Presets
Voice Over
- Voice Over in the Effect menu.
- Voice Over effect in the Add Effect window of Batch Processing.
Voice Over mixes foreground audio contained in the clipboard (use Copy first) with background audio contained in the file. Voice Over automatically fades the background audio in and out based on silent and non-silent regions within the foreground audio.
Use this effect to:
- Mix a voice recording or narration over background music so that the music automatically becomes quieter when the voice is speaking.
- Mix a translation over foreign dialogue so that the foreign dialogue can still be heard in the background.
- Automatically fade between two audio sources.
- Open the foreground file or voice file.
- Make adjustments for best results.
- Use the Copy on the Edit menu.
- Open the background or music file.
- Set the start marker where you want the voice over to begin.
- Use Voice Over on the Effect menu.
- Adjust settings or select a preset.
- Choose OK.
| Voice Over Settings | |
|---|---|
| Setting | Description |
| Fade out time (s) | Sets the amount of time it takes for the background audio to fade out before the foreground audio is mixed in. |
| Fade in time (s) | Sets the amount of time it takes for the background audio to fade in when the foreground audio ends or contains a long enough span of silence. |
| Fade volume (dB) | Sets the target volume of the background when it is faded out. Set it to the lowest value (Off) if no background audio is required when foreground audio is present. Usually values under -20dB are recommended when background audio is needed. |
| Voice volume (dB) | Sets the volume of the foreground audio. Values around -2dB to 0dB are recommended. |
| Silence level (dB) | Sets the level at which the foreground audio should be treated as silence. Recordings often contain some amount of background noise. To ensure proper detection of silence and accurate automatic fading, use values of -34dB or higher. Using the lowest (Off) value is not recommended. See the notes below to ensure consistent silence level detection. |
| Silence allowed (s) | Sets the duration of silence allowed in the foreground audio before the background audio is faded in. Usually narrations contain brief pauses where fading in is unnecessary and undesired. Adjust this setting to avoid fading in and out too frequently.
Note that this value is added to the fade in and out times to determine the total amount of silence required before the background audio starts to fade in. If Fade out time is 1.0, Fade in time is 1.0, and Silence allowed is 3.0, then the foreground audio would have to be silent for a total of 5.0 seconds before the background audio is faded in. |
The Voice Over window shows a graph of the current fade and mix settings. The clipboard (foreground or voice) audio is shown in red, the original file (background or music) audio is shown in blue, and a time line is shown under the graph. By default, background audio is faded out, which is shown by the blue region sloping downward. The steepness of the slope is controlled by the Fade out time setting. How low the background volume goes is controlled by the Fade volume setting.
Next the foreground audio is mixed in, which is shown by the red blocks. The volume (height) of the foreground region is controlled by the Voice volume setting. The space between the two red blocks represents the amount of silence allowed in the foreground audio before the background fades in again. It is controlled by the Silence allowed setting.
Finally, when the foreground audio ends or contains sufficient silence, the background audio fades in again, as shown by the blue region sloping upward. The steepness of the slope is controlled by the Fade in time setting. The level at which the foreground audio is considered silence is controlled by the Silence level setting and is shown as a yellow line in the graph.
If you use the Play button to start previewing, the graph displays a real-time representation of the faded and mixed audio. Recommended adjustments before copying the foreground audio to the clipboard:
- Use Trim Silence to remove any leading and trailing silences.
- Use Maximize Volume to ensure the volume level is optimal.
- Use Auto Offset Removal to remove any offset. A large offset may affect silence detection.
- Make sure the sampling rate (shown in the status bar) matches the sampling rate of the background file. If it does not, use Resample to change it.
See Also: Mix, Crossfade, Fade In, Fade Out, Shape Volume, Presets
Volume Menu
Volume in the Effect menu.The Volume submenu contains several volume related commands. Volumes are usually specified in decibels (dB) or by a percentage (%) of the sound's original amplitude. For more information about volumes, see Volume Scales in Appendix A. Unlike the volume fader in the Control window, which changes the device playback volume, these effects change the sound's data.
Auto Gain
- Auto Gain in the Effect | Volume menu.
- Auto Gain effect in the Add Effect window of Batch Processing.
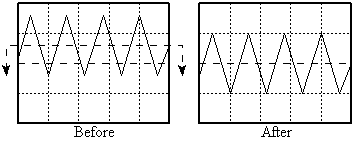
Use Auto Gain to even out the volume to a consistent level across the selection. When recording a speech, interview, or telephone conversation, for example, the volume tends to vary depending on the position of the microphone relative to the person speaking. If the person or microphone moves around, the volume fluctuates. With telephone recordings, one person often sounds louder than the other.
Auto Gain automatically varies the volume level to increase it when it is low and decrease it when it is high (but it cannot correct overloaded or clipped audio).
| Auto Gain Settings | |
|---|---|
| Setting | Description |
| Target volume (dB) | Sets the final peak volume of the audio. The gain is increased or decreased so that the peak level always hovers around this value. A value close to or slightly below 0dB (100%) is recommend for maximum volume. Values less than 0dB can be used to limit or clamp the peak level to a certain volume. The "Peak reducer" preset shows how peaks can be reduced to 90% without affecting the average volume. |
| Update interval (s) | Sets the time between volume adjustments. Values under one second give the best results. Use a smaller value if the audio level varies quickly. Use a larger value if the audio level is mostly even already, but needs occasional adjustments. |
| Attack/release (s) | Sets the time it takes for the volume to change from one interval to the next. Larger values smooth out volume changes so that they are more gradual. Setting this value to zero applies the new volume instantly every update interval. Usually values less than Update interval work best.
Note that when using a non-zero setting, peaks may exceed the target volume briefly as the volume gradually changes from a higher level to a lower one. |
| Maximum gain (dB) | Sets the maximum amount the volume can increase. Audio containing many noisy silences can result in sudden bursts of noise if the Silence level setting is not set high enough. By limiting the maximum gain, explosive volume increases for quiet sections are reduced. |
| Silence level (dB) | Sets the level of noise to be considered as silence. Any audio below this level is ignored and not adjusted. In other words, Auto Gain is turned off while the audio level is below this threshold. Care must be taken when setting this value. Setting it too low greatly amplifies background noise. Set it as high as possible while still getting good gain results. |
One drawback of Auto Gain is that background noise is amplified along with the foreground audio. In recordings where the background noise is consistent, but the foreground audio varies, the end result will be consistent foreground audio with varying background noise. Use Noise Reduction or other Filter effects in GoldWave before using Auto Gain to reduce or eliminate that problem.
For multichannel files, each channel is processed independently. While this ensures that the channels will have the same volume level, it may produce unbalanced stereo for short update intervals. If multichannel audio is not needed, convert the file to mono or use Channel Mixer in GoldWave to mix the channels into mono before using Auto Gain.
See Also: Compressor/Expander, Maximize Volume, Presets
Change Volume
- Change Volume in the Effect | Volume menu.
- Change Volume effect in the Add Effect window of Batch Processing.
Change Volume makes the selection louder or quieter.
To make the volumes of several different songs sound similar, use Loudness instead.
| Change Volume Setting | |
|---|---|
| Setting | Description |
| Volume (dB) | Sets the relative volume. Positive values make the selection louder. Negative values make the selection quieter. A value of 0dB leaves the volume unchanged. If you are unfamiliar with the decibel scale, adjust the fader and watch the percentage value. |
See Also: Auto Gain, Maximize Volume, Mute, Presets
Fade In
- Fade In in the Effect | Volume menu.
- Fade In effect in the Add Effect window of Batch Processing.
Fade In gradually increases the volume throughout the selection.
| Fade In Settings | |
|---|---|
| Setting | Description |
| Initial volume (dB) | Sets the starting volume. Use the lowest value to fade from silence. The volume increases to full (0dB) over the selection. |
| Logarithmic,
Linear | Sets the shape of the fade. Logarithmic fades in more rapidly than Linear. |
- Select the first 5 seconds of the sound.
- Choose Fade In from the Effect | Volume submenu.
- Enter −160 for the Initial volume.
- Choose OK.
See Also: Crossfade, Fade Out, Shape Volume, Presets
Fade Out
- Fade Out in the Effect | Volume menu.
- Fade Out effect in the Add Effect window of Batch Processing.
Fade Out gradually decreases the volume throughout the selection.
| Fade Out Settings | |
|---|---|
| Setting | Description |
| Final volume (dB) | Sets the final volume. Use the lowest value to fade to silence. The volume decreases over the selection. |
| Logarithmic,
Linear | Sets the shape of the fade. Logarithmic fades in more rapidly than Linear. |
- Select the last 5 seconds of the sound.
- Choose Fade Out from the Effect | Volume submenu.
- Enter −160 for the Final volume.
- Choose OK.
See Also: Crossfade, Fade In, Shape Volume, Presets
Match Volume
- Match Volume in the Effect | Volume menu.
- Match Volume effect in the Add Effect window of Batch Processing.
Match Volume makes the volumes of separate files seem similar.
This effect is considered obsolete. Please use Loudness instead.
When creating a CD, for example, you may notice that each song is recorded at a different volume level. This means you have to adjust the CD Player volume from one song to the next. By using Match Volume, you can adjust the volume levels of each song so they all have the same average level, eliminating the need to adjust the volume for each song later.
| Match Volume Settings | |
|---|---|
| Setting | Description |
| Average (dB) | Sets the overall average volume of the selection. |
| Allow clipping | Uses the given average level, regardless if clipping is required. |
| Reduce average level to avoid clipping | Reduces the average level just before processing begins to ensure that the audio will not be clipped. A lower level is used for the entire file, so the file may not sound as loud as other files processed with the same level where clipping was not required. |
| Abort processing if clipping is required | Processing is aborted immediately when clipping is required. A range error is displayed. Use this setting for batch processing to prevent writing clipped audio. |
Use Match Volume on each file to set the Average to the same value. Use Batch Processing to apply this effect to a group of files.
Volume changes are based on a root-mean-square (rms) average. The rms average is calculated with silent regions (below -44dB) excluded. Files with similar average levels will seem to have similar overall volume levels.
To match the left and right channel levels within a single file, use the MaxMatch instead.
The average value to use depends on the files. You should open each file and display the Match Volume effect to see what average value it has, then apply an overall average value to all the files. To avoid clipping distortion, it is best to use the minimum average across all files. For example, if one file has an average of -20dB and all the other files have a higher average, such as -18dB, then use -20dB for all files.
Unlike Maximize Volume, Match Volume may result in clipping distortion if the average level is set too high. The Final peak area displays the resulting final peak level after processing. If the peak exceeds 0dB, the value is shown in red as a warning that clipping may occur. Use a lower average to avoid clipping.
This effect should not be used with Maximize Volume. Use one or the other, but not both (one cancels the other).
See Also: Loudness, Auto Gain, Compressor/Expander, Maximize Volume, MaxMatch, Presets
Loudness
- Loudness in the Effect | Volume menu.
- Loudness effect in the Add Effect window of Batch Processing.
Loudness sets the volume of a file to an international standard level defined in ITU-R BS.1770-4.
When creating playlists you may notice that some songs have a different volume level and you have to adjust the volume control from one song to the next. By using Loudness, you can set the volume of each song to a standard level to avoid such variations. The LUFS (Loudness Units Full Scale) number provides a way to compare and match volumes of different files. Files with the same LUFS number will seem to have to same overall volume.
| Loudness | |
|---|---|
| Setting | Description |
| Volume (LUFS) | Sets the standard volume of the selection. The standard recommends -23 LUFS, however that tends to be much lower than most songs currently available. You can scan several songs in your playlist to see the current levels, then pick one of the lower levels to use on all files. |
| Allow clipping | Uses the given volume, regardless if clipping is required. |
| Reduce volume to avoid clipping | Reduces the volume just before processing begins to ensure that the audio will not be clipped. A lower volume is used for the entire file, so it will not be at the standard volume you've given. However this ensure no distortion occurs if the volume is too high for the file. |
| Abort processing if clipping is required | Processing is aborted immediately when clipping is required. A range error is displayed. Use this setting for batch processing to prevent writing clipped audio. |
| Calculate Loudness Range | Rescans the selection to calcualte the loudness range (similar to the dynamic range). This is a much slower calculation, so it is not performed automatically. The loudness range is defined in EBU Tech 3342. |
Use Loudness on each file to set the Volume to the same value. Use Batch Processing to apply this effect to a group of files.
Unlike Maximize Volume, Loudness may result in clipping distortion if the volume is set too high. The Final peak area displays the resulting final peak level after processing. If the peak exceeds 0dB, the value is shown in red as a warning that clipping will occur. Use a lower volume to avoid clipping or select the appropriate clipping option.
This effect should not be used with Maximize Volume. Use one or the other, but not both (one cancels the other).
See Also: Auto Gain, Compressor/Expander, Maximize Volume, MaxMatch, Presets
Maximize Volume (Normalize)
- Maximize Volume in the Effect | Volume menu.
- Maximize Volume effect in the Add Effect window of Batch Processing.
Maximize Volume sets the peak level of the selection. First it searches the selection for the current peak level. Then it displays the level and the position of the level within the file. You can then specify a new maximum peak level.
| Change Volume Setting | |
|---|---|
| Setting | Description |
| Maximum (dB) | Sets the new peak volume. The volume of the entire selection is changed so that the peak will match that value. A value of 0dB normalizes the volume to full dynamic range, making the sound as loud as possible without clipping distortion. |
Some effects in GoldWave may cause the volume level to go above 0dB. After using many effects, you should use the Maximize Volume effect before saving a file to ensure that the full dynamic range is not exceeded. Otherwise clipping may result in the saved file. Always use Maximize Volume before saving a file to avoid clipping and make full use of the dynamic range.
Do not use Maximize Volume after using Match Volume.
See Also: Auto Gain, Match Volume, MaxMatch, Mute, Presets
Shape Volume
- Shape Volume in the Effect | Volume menu.
- Shape Volume effect in the Add Effect window of Batch Processing.
Use Shape Volume to reshape the volume envelope of the selection using Shape Controls. The volume envelope is defined by the shape line, initially horizontal at 1.0, representing normal volume. Bend or move the line to dynamically change the volume over the selection. Add a point below 1.0 to decrease the volume. Add a point above 1.0, in the red section, to increase the volume. Note that increasing the volume may cause clipping distortion. Several preset shapes are included.
The Show envelope option calculates and displays the current volume envelope of the sound. The left channel envelope is shown in green and the right channel envelope is shown in red. To reduce the volume of background music before mixing in a voice recording or narration over the music:
- Open the voice file and make note of its length.
- Choose Copy from the Edit menu.
- Open the music recording.
- Choose Shape Volume from the Effect | Volume submenu.
- Select the "Fade for voice-over" preset.
- Adjust the trough of the shape so that its time length is slightly larger than the length of the voice file and its position is located where you want to mix the voice file.
- Choose OK.
- Adjust the start marker to the position where you want to mix the voice file (the beginning of the trough).
- Choose Mix from the Edit.
- Choose OK.
Note that Voice Over makes this much easier.
See Also: Auto Gain, Crossfade, Fade In, Fade Out, Pan, Voice Over, Presets
Playback Rate
- Playback Rate in the Effect menu.
- Playback Rate edit command in the Add Edit window of Batch Processing.
Playback Rate changes the playback rate of the entire sound. The sound plays faster (or slower) and its pitch is higher (or lower), similar to playing a vinyl record faster or slower. Essentially, this just changes the sampling rate value shown in the status bar. To change the playback speed without changing the pitch, use the Time effect.
While the playback rate of the audio device is controlled with the speed fader in the Control window, this has no effect on the file's data. You must use Playback Rate for the change to be permanent. Some file attributes may have a fixed sampling rate. A warning is shown in that case. An MP3 file with "Layer-3, 44100Hz, 192kbps, stereo" attributes, for example, is always saved with a 44100Hz sampling rate. You must use Save As to select attributes with the rate you want.
See Also: Doppler, Pitch, Time, Resample, Speed fader, Presets
Resample
- Resample in the Effect menu.
- Resample effect in the Add Effect window of Batch Processing.
Resample changes the sampling rate of the entire sound. Unlike Playback Rate, this command re-calculates and interpolates all the data so that the pitch and playback time are not affected. Use this command to convert any sampling rate to the standard CD rate of 44100Hz or the standard telephony rate of 8000Hz.
Resampling is done using a high quality polyphase algorithm with a filter length of 192.
If you have a sound recorded at 44100Hz and do not need CD quality, you can save large amounts of disk space by resampling the sound to 22050Hz or 11025Hz. This reduces the size by 2 to 1 or 4 to 1.
See Also: Time, Playback Rate, Presets